Create a custom animation with Elemental Menu
In this article, we will show you how to customize the Entrance Animation so that you can have unique animations which work with Elemental Menu.
How Elementor’s Entrance Animation works
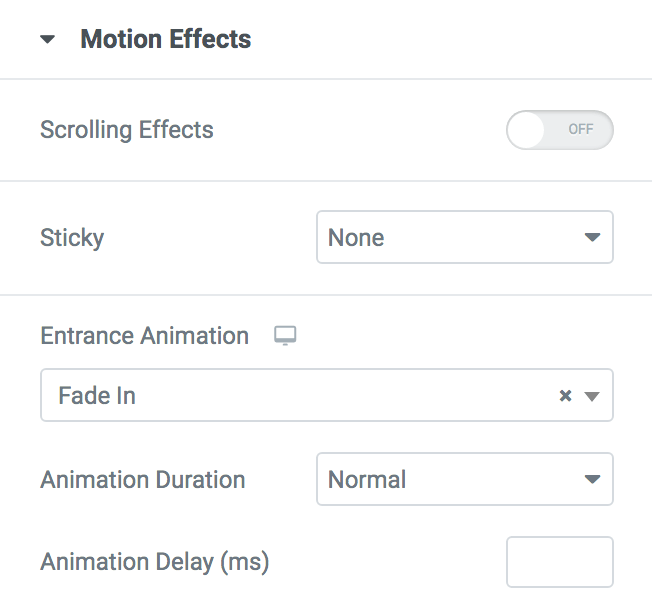
First of all, we need to understand how Elementor’s Entrance Animation works. At the time of this writing, it has three settings: Name, Duration and Delay.
We can figure out what those settings are for easily. And if you inspect the source code of an animated element, you will find out that Elementor’s Entrance Animations are based on the animate.css library.
So, in essense, Elementor hides an element and stores the settings’ value in an HTML data attribute. JavaScript will parse that data, timing the delay value to add animation classes and show the element to start an animation.
It means that the Entrance Animation is customizable, especially if you are familiar with the animate.css library.
Customize a default entrance animation
To customize an animation, we need to override the CSS rules of the animation.
For example,
To change the translate offset of the Fade In Up animation to 50px instead of 100%, you can add this code to a Custom CSS control:
/**
 * Make sure to use a correct keyframes.
 * Look at https://animate.style/
 */
@keyframes fadeInUp {
    from {
        opacity: 0;
        /* transform: translate3d(0, 100%, 0); */
        transform: translate3d(0, 50px, 0);
    }

    to {
        opacity: 1;
        transform: translate3d(0, 0, 0);
    }
}
The custom CSS will override the CSS rules of the default Fade In Up animation.
To change the animation-duration, we have to override CSS rules of Elementor. Below are the default rules for the values you see on the select box of the Entrance Animation control:
.animated { /* Normal */
    animation-duration: 1.25s;
}

.animated.animated-slow { /* Slow */
    animation-duration: 2s;
}

.animated.animated-fast { /* Fast */
    animation-duration: .75s;
}
Overriding animation-duration of the Fast one:
selector.animated.animated-fast {
    animation-duration: .5s;
}
If you don’t know what is the selector, check out this article.
Create a custom animation
Currently, this method works with Elementor Pro only.
The problem with overriding a default animation is that the @keyframes has no scope. Rewriting the fadeInUp keyframes will change the behavior of this animation on the whole site. And it is not a smart idea.
The only solution is to create custom animation keyframes. But, how to make it work with the animation APIs of Elementor. Yeah, something must be intuitive and easy to use.
After many tries, and thanks to the Custom Attributes control of Elementor Pro, we can do it.
As mentioned before, Elementor stores animation data in an HTML data attribute and JavaScript will use that data to execute an animation. It means that we can use JavaScript to replace a selected Entrance Animation with a custom animation added via the Custom Attributes control at runtime.
With that said, we made it possible to create a custom animation which seamlessly works with the Entrance Animation API. All you need to do is to load your CSS code and tell Elemental Menu the classname of your custom animation.
You can also watch this video to know how to do that.
Below are the steps:
-
Add your CSS animation code once, either via an external stylesheet or inline code of the Custom CSS control.
-
Select the element you want to animate, go to Advanced -> Attributes -> Enter a key|value pair with the key is
data-emm-animationand the value is the classname of the custom animation. E.g.data-emm-animation|myCustomAnimationClassname. -
With the current selected element, go to Motion Effect -> Select a random Entrance Animation (just to enable Elementor animation, selected value has no effect on the custom animation).
-
Adjust the Animation Delay and Animation Duration however you want. Note that if
animation-durationis already included in the CSS code of your custom animation, the Animation Duration value also has no effect.
What if I want different animations on different devices?
You just need to set the classname of the custom animation the targeted device. For Tablet, the key is data-emm-animation-tablet. For Mobile, the key is data-emm-animation-mobile.
That’s it.
If you have any problem, let us know in the comment section.